Ticket

Ticket TreeView
General Settings
User Defined 1 - 5 - User Defined fields add up to 5 more fields to be used for agency-specific needs. The User Defined 1 field is available in Global Search.
Mapping

Mapping Settings
Mapping Tile Url - Enter the URL of the Mapping Tile setup being used.
Tile Copyright Notice - Enter the copyright information for the Mapping Tile setup being used.
Comments
Comments are used when filling out Tickets as a way for Officers to save time when entering common notes.

Ticket Comment Options
Sequence - Enter the Sequence number. This decides where on the dropdown the option will appear.
Description - Enter the Ticket Comment.
ShowInC1, 2, 3, and 4 - Select which Comment boxes the Ticket Comment will be available in when filling out a Ticket.
Inactive - Inactivates the Ticket Comment.
Fields
Settings for the Fields that appear in the Ticket module are found here.

Fields Options
Display Name - The name of the Field being edited. This cannot be changed.
Default Value - Enter the default value for the Field. This is the value that will appear in the field when the Insert key is pressed on the keyboard while in that field.
Mandatory - Check this box to require this Field when saving a new Permit.
Tab Stop Off - Check this box to skip this Field when pressing tab to move through the Fields.
Note: Custom Fields are set up under the general Ticket settings.
Location
Locations are used to note specific lots and other designated parking locations.

Location Listing Sample
To add a new Location, click the Add button. To edit an existing Location, click the pencil icon next to the Location you wish to edit. To delete an existing Location, click the X icon next to the Location you wish to delete.
A Permit Lot is a parking lot that is designated for Permit use. A Timed Lot is a parking lot designated for timed use and may be enforced by meters, chalking, etc.
To create a Permit or Timed Lot, click the Click To Create button under the relevant header for the Location you wish to change.
Note: Once a Location has been made into a Permit or Timed Lot it cannot be undone.
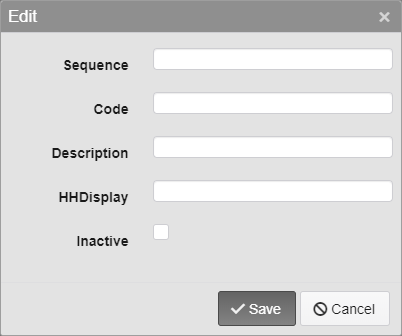
Location Options
Sequence - Enter the Sequence number. This decides where on the dropdown the option will appear.
Code - Enter the Code for the Location. 10 character limit.
Description - Enter a description of the Location.
HHDisplay - Enter what the Location will be listed as on handheld displays.
Inactive - Inactivates the Location.
Officers
Officers must be added here before they are able to log into the handheld.

Officers Options
Code - Enter the Code for the Officer. 10 character limit.
Last Name - Enter the Last Name of the Officer.
First Name - Enter the First Name of the Officer.
Password - Enter the Password the Officer will use to log into the handheld.
Security Level - Select the Officers Security Level.
1 - Officer - Officers can issue Tickets and see if their handhelds are downloading existing Ticket and Scoff information.
2 - Admin - Admins can change settings such as the Printer and Sync settings, as well as change Ticket numbers in addition to everything Officers can do.
Inactive - Inactivates the Officer.
States
The State dropdown is used to define the State section of an address or the registration of a Vehicle. It can be arranged so that the most commonly used States are at the top of the list.

State Entry Options
Sequence - Enter the Sequence number. This decides where on the dropdown the option will appear.
Code - Enter the Code for the State. 2 character limit.
Description - Enter a description of the State.
Inactive - Inactivates the State.
Note: The same State fields are used in multiple places in TickeTrak, they are just listed multiple times in the settings.
Status
Enter other Statuses to be attached to Tickets. These can be anything your organization wishes to make note of.

Status Options
Code - Enter the Code for the Status. 10 character limit.
Description - Enter a description of the Status.
Inactive - Inactivates the Status.
Violation
Violations are defined here, with the Amount and other settings set up for each individual Violation.
Sequence - Enter the Sequence number. This decides where on the dropdown the option will appear.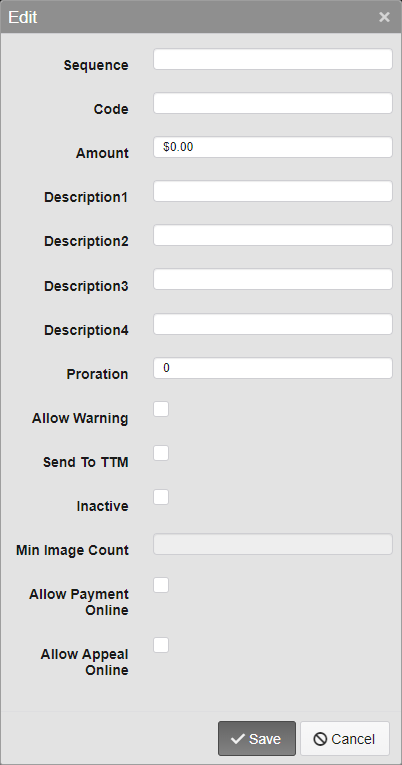
Code - Enter the Code for the Violation. 15 character limit.
Amount - Enter the default Fine for the Violation.
Description1, 2, 3, and 4 - Enter descriptions for the Violation. Only Description1 will appear in the Ticket module.
Allow Warning - Allow the Violation to be cited as a Warning, with no Fine attached.
Send to TTM - Send to TickeTrak Mobile. This allows the Violation to be recorded in the field via handhelds.
Inactive - Inactivates the Violation.
Min Image Count - Only active if Send to TTM is checked. Enter the number of images required to be submitted when a Ticket for the Violation is made.
Allow Payment Online - Allow Tickets with this Violation to be paid online.
Allow Appeal Online - Allow Tickets with this Violation to be Appealed online.
Note: The same Violation fields are used in multiple places in TickeTrak, they are just listed multiple times in the settings.
Was this article helpful?
That’s Great!
Thank you for your feedback
Sorry! We couldn't be helpful
Thank you for your feedback
Feedback sent
We appreciate your effort and will try to fix the article